
Introduction
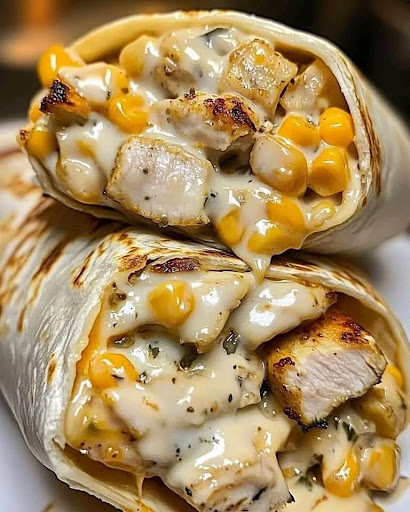
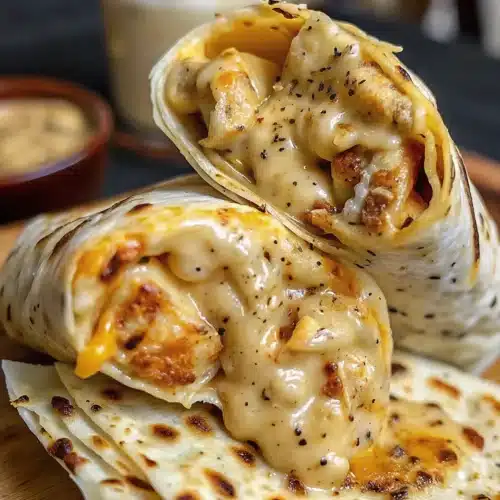
Who doesn’t love a cheesy, garlicky, chicken-filled wrap that’s both quick and tasty? These Easy Cheesy Garlic Chicken Wraps are perfect for lunch, dinner, or even a fun party snack. They’re packed with flavor, super easy to make, and you don’t need any fancy cooking skills.
Just a few everyday ingredients and a few simple steps, and you’ll have a warm, melty wrap that everyone will love. Whether you’re a busy parent, a student, or just someone who wants a fast and filling meal, this recipe is for you. Let’s get started!
Ingredients – Cheesy Garlic Chicken Wraps
Here’s everything you need to make 4 cheesy garlic chicken wraps:
For the Chicken Filling:
- 2 cups cooked chicken (shredded or diced)
- 1 cup shredded mozzarella cheese
- ½ cup shredded cheddar cheese
- 2 tablespoons cream cheese (softened)
- 1 tablespoon garlic powder (or 2 garlic cloves, minced)
- 1 tablespoon olive oil or butter
- Salt and pepper to taste
- 1 teaspoon dried oregano (optional)
- 1 teaspoon chili flakes (optional, for spice)
For the Wraps:
- 4 large flour tortillas (or any wraps you like)
- 1 tablespoon butter or oil (for grilling)
Optional Add-ins:
- Lettuce
- Sliced tomatoes
- Cooked bell peppers
- Sour cream or mayonnaise
Step by Step Process – Cheesy Garlic Chicken Wraps
Follow these easy steps to make your delicious cheesy wraps.
Step 1: Cook or Prep the Chicken
If you don’t already have cooked chicken, you can boil or pan-fry two chicken breasts and shred them. You can also use leftover chicken or rotisserie chicken.
Step 2: Make the Garlic Cheese Mixture
In a bowl, mix the mozzarella, cheddar, and cream cheese. Add garlic powder (or minced garlic), oregano, chili flakes, salt, and pepper. Mix it well until creamy.
Step 3: Mix the Chicken and Cheese
Now add your shredded chicken to the cheese mixture. Stir everything until the chicken is fully coated with the cheesy, garlicky mix.
Step 4: Fill the Tortillas
Lay out your tortillas. Spoon the chicken-cheese mixture onto the center of each one. Don’t overfill – leave room to fold.
Add any extra toppings you like – lettuce, tomato, or a little sour cream.
Step 5: Fold the Wraps
Fold the sides in, then roll the bottom up and over the filling. Roll it tightly like a burrito so nothing falls out.
Step 6: Grill the Wraps
Heat a non-stick pan or skillet over medium heat. Add a little butter or oil. Place the wraps seam-side down and grill for 2–3 minutes on each side until golden brown and crispy.
Step 7: Serve and Enjoy!
Cut the wraps in half and serve hot. They go great with ketchup, garlic mayo, or a simple salad on the side.
Nutritional Information
| Nutrient | Amount |
|---|---|
| Calories | 430–480 kcal |
| Protein | 30g |
| Total Fat | 20g |
| Saturated Fat | 9g |
| Carbohydrates | 30g |
| Dietary Fiber | 2g |
| Sugar | 2g |
| Sodium | 650mg |
| Calcium | 150mg |
| Iron | 2mg |
Frequently Asked Questions
Q1: Can I use store-bought rotisserie chicken?
Yes! Rotisserie chicken works great and saves time. Just shred it and mix it with the cheesy garlic mixture.
Q2: What kind of cheese is best?
Mozzarella melts beautifully, and cheddar adds a nice sharp flavor. You can also try pepper jack or Monterey Jack for extra taste.
Q3: Are these wraps spicy?
Not unless you add chili flakes. You can adjust the spice level to your liking.
Q4: Can I make these wraps ahead of time?
Yes, you can make them and refrigerate them for up to 2 days. Just reheat them in a pan or microwave before serving.
Q5: Are there vegetarian options?
Sure! Just swap the chicken with grilled veggies, tofu, or paneer. The cheesy garlic base works with many fillings.
Q6: Can I bake them instead of grilling?
Yes! You can place the filled wraps on a baking sheet, brush them with butter or oil, and bake at 180°C (350°F) for 10–12 minutes until crispy.
Final Thoughts
And there you have it – your Easy Cheesy Garlic Chicken Wraps are ready to enjoy! These wraps are the perfect mix of creamy, garlicky, cheesy, and satisfying. They’re great for lunchboxes, quick weeknight dinners, or even lazy weekends.
You don’t need to be a pro chef to make them. Just gather your ingredients, follow the simple steps, and enjoy a tasty, homemade meal that feels like something out of a café – but made right in your kitchen. So, what are you waiting for? Grab those tortillas and start wrapping!