
Introduction
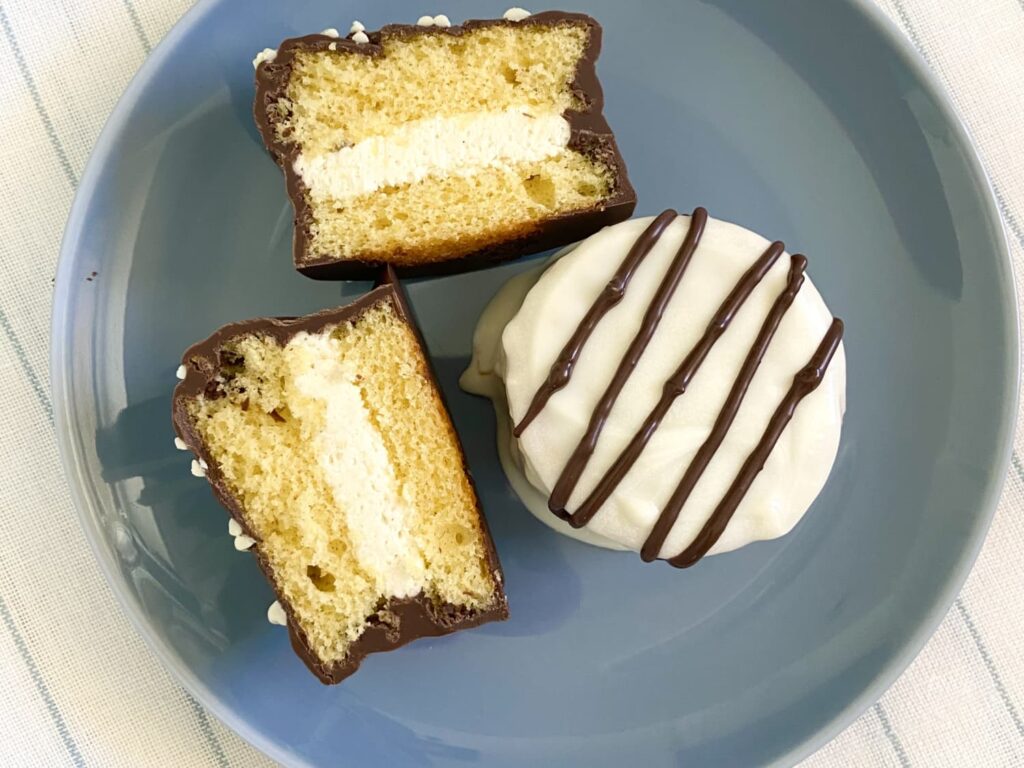
Who doesn’t love those classic Little Debbie Zebra Cakes? With their soft vanilla cake, creamy filling, sweet white coating, and fun chocolate stripes—they’re a favorite snack for kids and adults alike. But did you know you can make your own right at home? That’s right! With just a few ingredients and simple steps, you can enjoy DIY Zebra Cakes that taste just like the original.
Homemade zebra cakes are not only fun to make, but they also let you control what goes into your food. No preservatives or hard-to-pronounce ingredients—just sweet, fresh goodness. Plus, these cute little cakes are perfect for birthdays, lunchboxes, or whenever you’re craving something sweet and nostalgic. Let’s dive into the ingredients and how to make these yummy treats!
Ingredients – DIY Zebra Cakes
Here are the simple ingredients you’ll need to make your own DIY Zebra Cakes:
For the Cake:
- 1 box of white or yellow cake mix (plus ingredients listed on the box like eggs, oil, and water)
- 1 teaspoon vanilla extract (optional, for extra flavor)
For the Cream Filling:
- 1/2 cup unsalted butter (softened)
- 1/2 cup vegetable shortening
- 2 cups powdered sugar
- 2 tablespoons heavy cream or milk
- 1 teaspoon vanilla extract
For the Coating:
- 2 cups white chocolate chips or white candy melts
- 1 tablespoon vegetable oil (to make coating smooth)
For the Chocolate Stripes:
- 1/2 cup semisweet chocolate chips
- 1 teaspoon vegetable oil
Step by Step Process – DIY Zebra Cakes
Step 1: Bake the Cake
- Preheat your oven to 350°F (175°C).
- Grease and line a baking sheet or jelly roll pan with parchment paper.
- Prepare the cake batter as directed on the box.
- Pour the batter into the pan and spread it out evenly.
- Bake for about 20–25 minutes or until a toothpick comes out clean.
- Let the cake cool completely.
Step 2: Make the Cream Filling
- In a large bowl, beat the butter and shortening together until smooth.
- Add the powdered sugar, vanilla extract, and cream.
- Mix until the filling is fluffy and light.
- Set aside or refrigerate if your kitchen is warm.
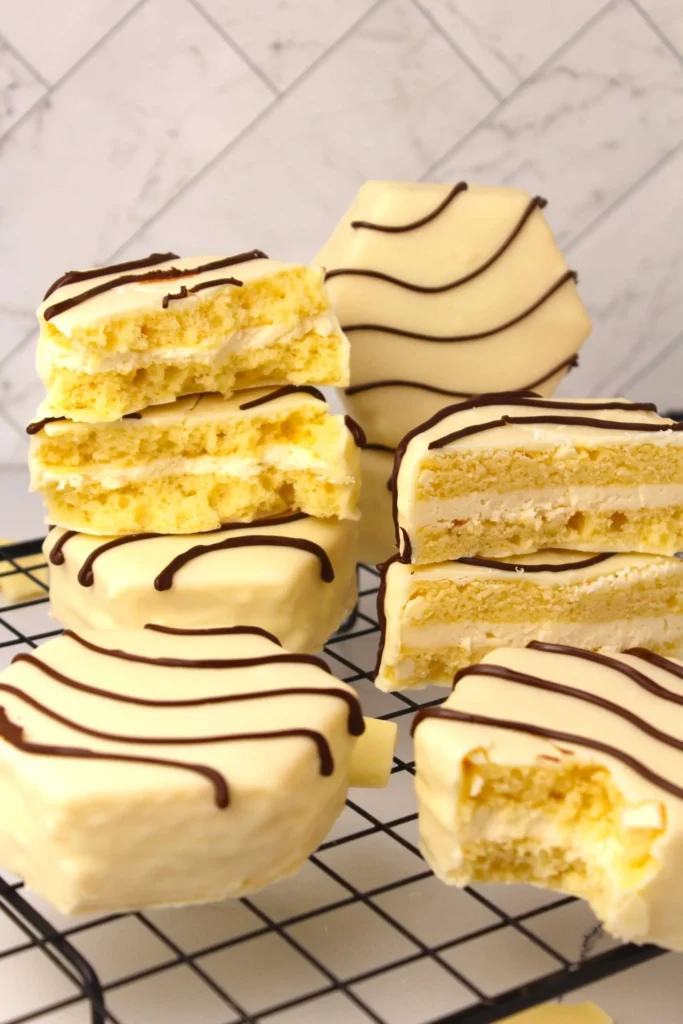
Step 3: Cut the Cake
- Once the cake has cooled, use a round cookie cutter (about 2.5 inches wide) to cut out even circles.
- You should get about 12 circles, making 6 complete zebra cakes (top and bottom).
Step 4: Add the Filling
- Spread or pipe a layer of cream filling on one cake circle.
- Place another circle on top to make a little sandwich.
- Repeat until all cakes are stacked and filled.
Step 5: Chill the Cakes
- Place the cakes in the freezer for about 30 minutes. This makes them easier to coat.
Step 6: Coat with White Chocolate
- Melt the white chocolate chips or candy melts with the vegetable oil until smooth.
- Dip each chilled cake into the white coating or spoon it over the top to fully cover.
- Place the coated cakes on a wire rack or parchment paper and let the coating harden.
Step 7: Add the Chocolate Strip
- Allow the cakes to sit until the chocolate stripes are firm.
- Enjoy immediately or store in the fridge for a few days!
Nutritional Information
| Nutrient | Amount (Per Cake) |
|---|---|
| Calories | 380–420 |
| Total Fat | 22g |
| Saturated Fat | 10g |
| Cholesterol | 40mg |
| Sodium | 180mg |
| Total Carbohydrates | 46g |
| Sugars | 34g |
| Protein | 3g |
| Fiber | 0.5g |
Frequently Asked Questions
Q1: Can I use homemade cake instead of boxed mix?
Yes! If you prefer to make your cake from scratch, go for it. Just make sure it’s a soft vanilla cake that can be sliced easily.
Q2: What can I use instead of shortening in the filling?
You can use all butter instead of shortening, but the texture will be softer and a bit richer in flavor.
Q3: Can I freeze homemade zebra cakes?
Yes, you can! Freeze them in an airtight container for up to 1 month. Thaw in the fridge before eating.
Q4: Are these cakes gluten-free?
Not unless you use a gluten-free cake mix. Be sure to check your labels if you need them to be gluten-free.
Q5: How long do homemade zebra cakes last?
If stored in the fridge in an airtight container, they should stay fresh for 3–5 days.
Final Thoughts
DIY Zebra Cakes are a fun and delicious way to bring a little nostalgia back into your kitchen. They’re soft, sweet, and have just the right amount of chocolatey crunch on top. Plus, making them at home means you know exactly what’s in each bite—and that’s always a win!
Whether you’re baking with kids, prepping for a party, or just treating yourself, these copycat Little Debbie snack cakes are a great pick. They may take a few steps, but each one is simple and easy to follow. And the end result? Totally worth it. So grab your apron, heat up that oven, and start making your very own zebra cakes today. Your taste buds will thank you.